Another Easy Way of Composing Music

  1. Improvise a riff, an ostinato. Or loop a short sequence of notes.
  2. Write a bassline. Maybe make an alternative pattern.
  3. Add drums.
  4. Extract kick, snare, hihats etc. to individual channels.
  5. Put in a chord progression on strings or pads to follow the bass.
  6. Add a second voice on an octave from the first riff, harmonize.

Some people get more inspired by starting with the drums (so you can change order of point 1-3). Anyway, by now you have a few bars repeating over a few seconds. Copy and paste this sequence with all channels active. It’s then time to arrange a song structure by removing channels.

Perhaps begin with an intro of the riff, build up with drums, add bass, mute the riff, let bass and drum play together for a few bars, add a new lead, bring in the original riff, mute bass and kick, put in a breakdown with only chords, make a drop with everything you got, mute some of the instruments, add others, change instrument for an already played sequence, change octave for bass for a brief moment etc. Remember to split the full drum pattern and mute different drums on different parts of the track.

Depending of what kind of orchestration your after, but maybe keep it simple – like a real five man band, where the drummer only have two hands and two feet, so don’t hit all cymbals and toms at once even if you can electronically. And each other band member plays only one instrument at a time.

In other words write a few bars of music with five different instruments that sound good together, then just mute and unmute over time.

And If you’re into pop music, you might what to construct your song around verse, chorus, bridge and so on, and write a strong lead melody over all parts.
Standard

A Way to Write Electronic Music

Okay so the last article was about why I don’t use DAW templates – how I prefer starting from scratch without any predefined workspace to save time – this time I’m going to tell you what I actually usually do when writing music.

Firstly, everything starts out of passion – a will to create. I don’t need to make music to be able to put food on the table, or I don’t need to release stuff because anyone says so. I do this simply because I enjoy it.

Right, I usually begin by setting up a few rules and limitations for myself to help define the track, and to drive creativity; it could be deciding on what expression I’m pursuing – tone and atmosphere, or what style of music I’m after.  It could also be about limiting the amount of sound sources/synths. Which equipment to use, e.g. compressors, limiters, saturation units etc.

Sometimes I write music with only a basic piano sound (those tracks tend to have a more traditional musical structure and rhythm).

But more often, I start by making a sound, a patch on a synth, and write music around it. I’m finding use for it, improvising a riff or musical motif and then building a context. This rough draft is done rather quickly, but may be reconstructed later on during the process of music making.

Here’s a set of guiding principles outlining a course of action:

  1. Make a patch, design a sound.
  2. Sequence a loop using this patch.
  3. Find a context, decide on what kind of track you want to do.
  4. Program a 8-16 bar drum pattern, at this point, not too advanced.
  5. Compose a rough structure.
  6. Fill out the song, e.g. bassline, chords, harmonies.
  7. Change and layer sounds, make new patches to fit the song as you go.
  8. Repeat step 5-7 until you’re happy with the result.
  9. Make a final mix (this won’t be final but mix the song as it was the last).
  10. Do your mastering process.
  11. Reference your track on several sound systems, both on hi-fi and on cheaper speakers (don’t forget headphones and on different volume levels).
  12. Repeat step 9-11, but make sure that you do finish. If it looks like you never going to be satisfied with the song, then leave it, and move on and start anew.
Standard

Sound Monitoring on Different Systems

While I think it’s important to be monitoring music productions on several systems, this time it has become more of a biproduct of premisses in the making of my new recording.

Now my main monitors are the Genelec 8030A which sounds clear but lacks a little bass. And because the home studio is located in the bedroom (not acoustically treated) I also listen on headphones a lot. I use Sennheiser HD 25-1 II which sounds pretty balanced and good, although not too comfortable.

Sometimes I must to shift place (to the dinner table) and work solely in the box (meaning Ableton Live), and sometimes I mix, mala fide, on the classic Koss Porta Pro on ear headphones.

I’m playing the music on a smaller hi-fi home system (NAD C 320BEE amplifier and DALI Concept 2 speakers with 6.5” woofer/midrange) to get more bass, and to add a larger room ambience and noise to the experience.

I also listen to bounces of the mix on Apple’s muffled EarPods, extensively, because I want the music to sound okay there too. And when outdoors I listen on the wireless Bose SportSound (that aren’t noise cancelling).

I’ve also listen on the shitty laptop speakers of my MacBook Pro and on speakers of the iPhone, just do hear which frequencies are coming through hard and how the sub translate on tiny speakers.

And lastly, I try to listen not only focused, but also in the background with people talking, while cooking and such. This is not very scientific, but I sometimes hear annoying frequencies or other things in the music that I normally wouldn’t recognize.

All this monitoring aims to find a mastering sweet spot for music to sound as intend. That means, perhaps not the “best” from a technical point of view, but from at sound, mood and feel perspective. In music, I’m trying to communicate and achieve something that has not necessarily to do with audiophile correctness or fine sound reproduction. Controlled and uncontrolled dirt and noise are most welcome in my music.

Standard

Sound Monitoring on Different Systems

While I think it’s important to be monitoring music productions on several systems, this time it has become more of a biproduct of premisses in the making of my new recording.

Now my main monitors are the Genelec 8030A which sounds clear but lacks a little bass. And because the home studio is located in the bedroom (not acoustically treated) I also listen on headphones a lot. I use Sennheiser HD 25-1 II which sounds pretty balanced and good, although not too comfortable.

Sometimes I must shift place (to the dinner table) and work solely in the box (meaning Ableton Live), and sometimes I mix, mala fide, on the classic Koss Porta Pro on ear headphones.

I’m playing the music on a smaller hi-fi home system (NAD C 320BEE amplifier and DALI Concept 2 speakers with 6.5” woofer/midrange) to get more bass, and to add a larger room ambience and noise to the experience.

I also listen to bounces of the mix on Apple’s muffled EarPods, extensively, because I want the music to sound okay there too. And when outdoors I listen on the wireless Bose SportSound (that aren’t noise cancelling).

Moreover, I listen on the shitty laptop speakers of my MacBook Pro and on speakers of the iPhone, just do hear which frequencies are coming through hard and how the sub translate on tiny speakers.

And lastly, I try to listen not only focused, but also in the background with people talking, while cooking and such. This is not very scientific, but I sometimes hear annoying frequencies or other things in the music that I normally wouldn’t recognize.

All this monitoring aims to find a mastering sweet spot for music to sound as intended. That means, perhaps not the “best” from a technical point of view, but from at sound, mood and feel perspective. In music, I’m trying to communicate and achieve something that has not necessarily to do with audiophile correctness or fine sound reproduction. Controlled and uncontrolled dirt and noise are most welcome in my music.

Standard

About Euclidean Rhythms

Everybody seems to be talking about Euclidean rhythms, but here’s a short explanations on this blog anyway.

The Euclidean algorithm computes the greatest common divisor of two given integers. This is used to distribute numbers as evenly as possible, not only in music, but in applications in many fields of scientific research, e.g. string theory and particle acceleration.

Euclidean rhythms are derived from two values: one that represents the length of the pattern in steps, and the other that defines the hits or notes to be distributed evenly across that pattern. Any remainders are also to be distributed.

Here’s two examples. First: E(2,8), this means a sequence of eight beats and two hits [11000000], where 1 is a hit and 0 represents a rest. Spread out evenly across, it should look something like this [10001000].

A second example: E(5,8), with five hits, [11111000] via [10101011] looks like this after the remainders are distributed as evenly as possible [10110110].

Any two numbers can be combined to generate a semi-repetitive pattern. It’s possible to offset the rotation of the sequence by a certain number of steps. And by playing several patterns with differents lengths and offsets, complex polyrhythms can occur. For example, try playing E(2,8), described as above, together with E(5,16) like this [0010010010010010].

Standard

Mixing at the Right Levels

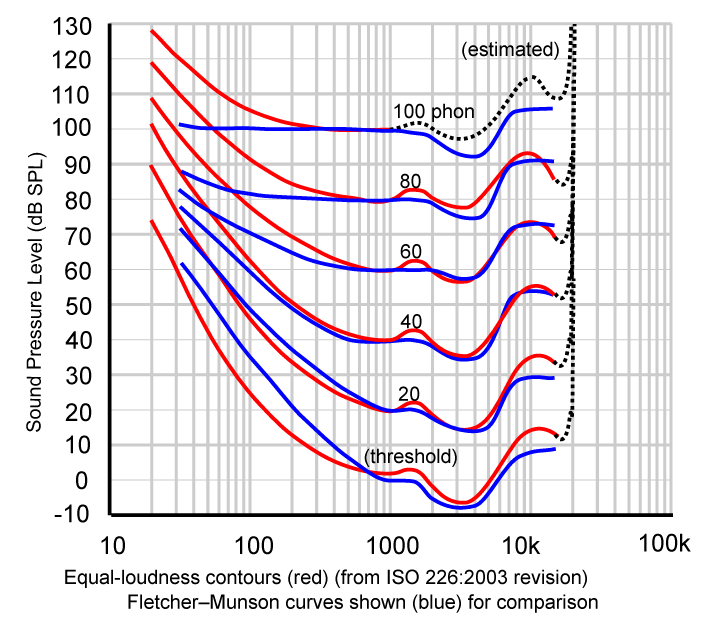
There’s this theory of the ear that it hears different frequencies at different levels. The Fletcher-Munson curves, commonly known as equal-loudness contours, indicate the ear’s average sensitivity to different frequencies at various amplitude levels.

image

Even if the tonal balance of the sound remains the same, at low volume, mid range frequencies sound more prominent. While at high listening volumes, the lows and highs sound more prominent, and the mid range seems to back off.

In short, this explains why quieter music seems to sound less rich and full than louder music. Generally it’s better for the music to sound good as the volume increases.

As a consequence of this, you should edit, mix and work on your music on a high enough volume (not ridiculously loud), so that you can make sure your music doesn’t sound terrible when it’s listened to at a higher level. Because as a music producer you would want your music to sound best when the listener is paying full attention. But use caution, don’t damage your ears bla bla bla.

Standard

Vocal Delay Ducking

The normal thing to treat a dry vocal is to put reverb and delay on it. But that could make the vocal a bit muddy.

To keep it in-your-face and conserve the clarity of the vocal, while still having an effect to make it sound bigger, try ducking the volume of the delays whenever the dry vocal is active. To do so, side-chain the delay bus to the lead vocal track.

For example, use a delay device on a return bus and put a quarter note delay with low feedback, and send it to the vocal track with a little less volume. On the same bus, put a compressor and select the vocal track as the side-chain source. Set it up as you like, perhaps bring down the wet-parameter some.

You can also try the same thing with a reverb.

Standard